Installing solar flood lights on a concrete wall is a practical solution for outdoor illumination. Many homeowners seek to enhance security and visibility around their properties. Understanding how to install solar flood lights on a concrete wall? This guide will simplify the process for you.
Concrete walls offer a sturdy base for solar flood lights, ensuring durability and consistent performance. Proper installation is crucial to maximizing the solar panel’s efficiency. The right techniques can prevent common pitfalls such as poor alignment or inadequate drainage.
While the process may sound straightforward, various challenges may arise. Uneven surfaces or difficult access can complicate installation. Recognizing these potential challenges beforehand can save time and effort. Being prepared helps in overcoming these hurdles effectively. With the right tools and a clear plan, you can achieve optimal lighting without professional help.
Solar flood lights are becoming popular for outdoor illumination. They convert sunlight into energy, making them eco-friendly. These lights are easy to install and can brighten up patios, gardens, or driveways. With no wiring needed, they offer great flexibility in placement.
The benefits of solar flood lights are impressive. They provide significant savings on electricity bills. Additionally, their low maintenance is appealing. Most models work even during cloudy days. However, some may not provide sufficient brightness for extensive areas. Choosing the right wattage is crucial. Also, consider seasonal variations in sunlight.
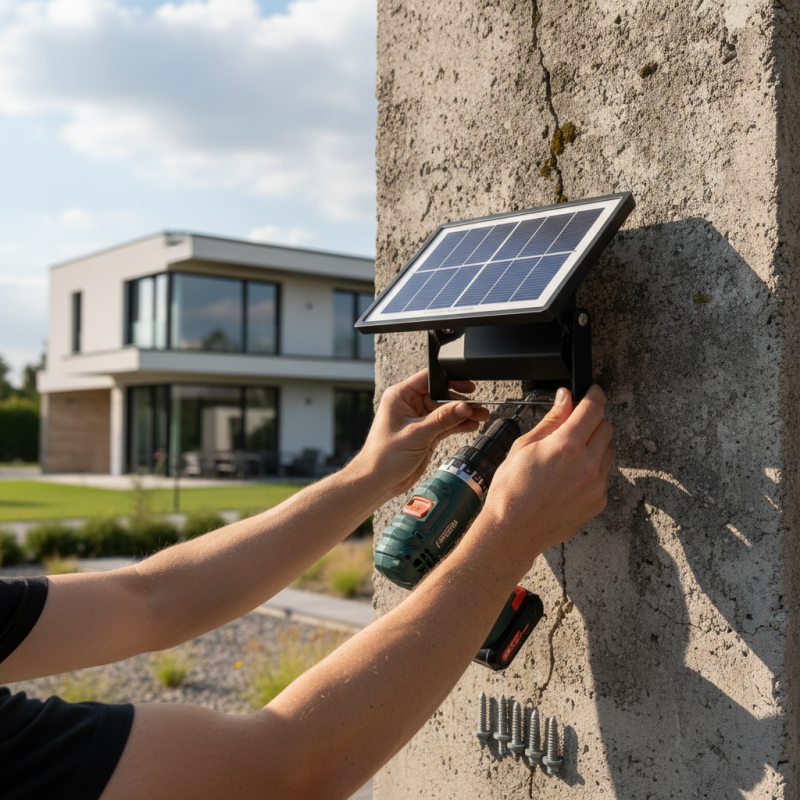
Installing these lights on a concrete wall can be straightforward. A well-positioned solar flood light can illuminate the darkest corners. Yet, improper placement might lead to less effectiveness. It's essential to check the sun's path and adjust accordingly. Understanding these factors enhances their performance and longevity.
Choosing the right location for installing solar flood lights on a concrete wall is crucial. Start by assessing the area that needs illumination. Look for spots where light is most effective. This often includes pathways, entrances, or yards. These spaces benefit greatly from enhanced visibility.
Consider the sun's position. Solar panels work best in direct sunlight. Avoid shaded areas created by trees or buildings. Measure how much sunlight your chosen spot receives throughout the day. A well-lit area can dramatically improve the light's efficacy.
Installation height matters, too. Aim for at least eight to ten feet above the ground. This height minimizes obstruction while maximizing coverage. Be mindful of local regulations regarding outdoor lighting. Also, check for any potential interference from nearby structures. These small details can significantly impact the overall performance of your solar flood lights.
When preparing to install solar flood lights on a concrete wall, gathering the right tools and materials is crucial. You'll need a power drill, screws, a level, and a screwdriver. A tape measure will help you position the lights accurately. Additionally, ensure you have your solar flood lights ready for installation.
Consider these tips: Ensure the lights are positioned to capture maximum sunlight. This will improve their efficiency. Check the weather forecast before installation. Rainy days can complicate your work and might lead to safety issues.
Concrete surfaces can be unforgiving. You might encounter challenges, like cracking or crumbling. If this happens, review your techniques. Adjust your drilling pressure accordingly. It's also wise to have extra screws and anchors on hand, just in case of mishaps. Proper preparation can save you time and frustration during installation.
| Item | Description | Quantity | Notes |
|---|---|---|---|
| Solar Flood Light | The main lighting fixture using solar energy. | 1 | Choose a model with sufficient brightness for your needs. |
| Drill | Tool for making holes in concrete. | 1 | Ensure it's suitable for concrete walls. |
| Drill Bits | Specialized bits for drilling into concrete. | 2 | Use appropriate size for mounting screws. |
| Screws | Fasteners for securing the light fixture. | 4 | Choose corrosion-resistant options. |
| Level | Tool for ensuring the light is straight. | 1 | Optional, but recommended for alignment. |
| Hammer | Tool for helping with screws if necessary. | 1 | Use for tapping in anchors if required. |
| Measuring Tape | Tool for measuring distances on the wall. | 1 | To ensure proper placement of the light. |
Installing solar flood lights on a concrete wall can enhance outdoor security and aesthetics. The process, while straightforward, requires attention to detail to ensure optimal performance. According to industry reports, solar flood lights can provide up to 80% savings on energy costs over traditional lighting. Here’s a step-by-step installation process.
Begin by selecting the ideal location. Ensure the spot receives adequate sunlight during the day. This is crucial since solar lights depend on natural light for charging. Next, gather necessary tools, such as a drill, mounting brackets, and screws. Measure and mark the positions for the brackets on the wall. Drill the holes and secure the brackets firmly.
When the brackets are in place, attach the solar flood light. Before securing everything, check the angle and direction to maximize sunlight exposure. This small adjustment can significantly impact performance.
Tips: Choose lights with motion sensors to improve energy efficiency. Test the lighting at night after installation. A dim light may indicate insufficient sunlight during the day. Reflect on the installation’s effectiveness. Are the lights bright enough? Over time, maintenance may be necessary to keep them functioning well.
Installing solar flood lights on a concrete wall requires careful consideration of
optimal performance and maintenance. To enhance efficiency, ensure the solar panels receive direct sunlight.
Avoid placing them in shaded areas. Dust and debris can
significantly obstruct light absorption. Regularly clean your solar panels with a damp cloth. Even a small amount
of dirt can reduce their effectiveness.
Battery maintenance is another crucial aspect. Most systems include rechargeable batteries. Check their status
periodically. Replace them every few years to prevent dimming. It’s easy to overlook this maintenance aspect,
but it directly affects performance. Also, ensure that the light fixtures are securely mounted to withstand wind and precipitation.
A loose installation can lead to unexpected failure.
Consider using a timer or motion sensor. This can provide both convenience
and energy savings. Evaluate your needs regularly. Are the lights bright enough? Do they activate at
the right times? Take note of any issues and address them promptly. Neglecting small problems can lead to bigger headaches down the road.
: Choose areas like pathways or entrances that require visibility. Avoid shaded spots for better light efficacy.
Measure sunlight exposure at your chosen location. Avoid places with shade from trees or buildings.
Aim to install them 8 to 10 feet above ground for optimal coverage and reduced obstruction.
You will need a power drill, screws, a level, a screwdriver, and a tape measure for accuracy.
Adjust your drilling pressure and techniques. Have extra screws and anchors ready for unexpected issues.
Regularly clean them with a damp cloth. Even a small amount of dirt can reduce their effectiveness.
Check the rechargeable batteries periodically and replace them every few years to avoid dimming.
Loose fixtures may fail during wind or precipitation. Proper installation ensures long-term performance.
Yes, these can enhance convenience and save energy. Evaluate your needs and adjust settings regularly.
If lights are not bright enough or fail to activate correctly, take note and address the problems promptly.
When considering **how to install solar flood lights on a concrete wall**, it's essential to first understand the benefits that solar flood lights offer, such as energy efficiency and ease of installation. Selecting the right location on the concrete wall is crucial for maximizing sunlight exposure, which enhances the lights' performance.
To begin the installation, gather all necessary tools and materials to ensure a smooth process. The step-by-step installation involves mounting the fixtures securely and making necessary adjustments for optimal solar capture. Lastly, maintaining the solar flood lights with regular cleaning and checks will ensure their longevity and effectiveness, allowing you to enjoy the benefits of your solar lighting for years to come.
Suvlux Light